If this feature is not enabled or there are some conflicts, you will get the “VT-x is disabled in BIOS” error on VirtualBox and Android Studio. On VirtualBox, the message displays something like: “VT-x is disabled in the BIOS for all CPU modes (VERR_VMX_MSR_ALL_VMX_DISABLED).” And on Android Studio, the error message displays, “Intel HAXM is required to run this AVD. VT-x is disabled in BIOS.”Since the solutions for both these errors are similar, we have compiled them into a single article. However, some fixes are specific to one application only. So read carefully and apply the relevant fixes.
Why my VT-x is Disabled in BIOS
How to Enable VT-x in BIOS
First, make sure you are not running a 64-bit guest OS on a 32-bit host machine. Then, apply the possible solutions below to resolve your issue.
Virtualization not enabled in BIOS.Trying to Run 32-bit guest OS with more than 4 GB RAM.Improper PAE/NX setting for VM.Interference due to Security Apps that use Virtualization.Hyper-V conflicting with VirtualBox or HAXM.Bugs in Intel HAXM (Android Studio).
Check VT-x Status
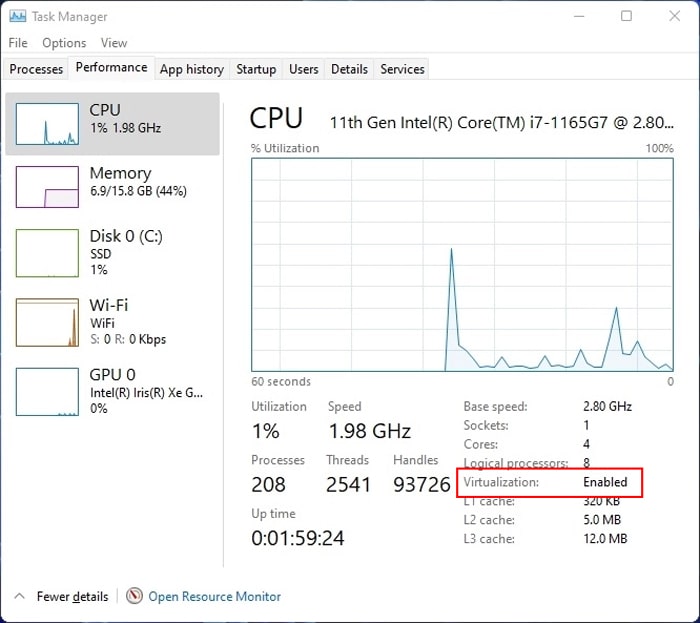
You may get the error message “VT-x is disabled in BIOS” on VirtualBox or Android Studio even when Virtualization (VT-x) is enabled BIOS. So, first, you need to check the status of this feature.Before that, make sure to use identification tools such as Intel Processor Identification Utility and AMD-V Detection Utility to check if your CPU supports VT-x. If it doesn’t, you will need a CPU upgrade.To check if VT-x is enabled in BIOS or not,Also, while it may seem like you need to enable Virtualization to run VMs, it’s not always the case. For instance, running a 32-bit OS on a VM doesn’t require VT-x, but the performance improves if it’s enabled. It is because a 32-bit OS can run on a Software-assisted Virtualization, but a 64-bit guest OS needs Hardware-assisted Virtualization.
Enable VT-x in BIOS
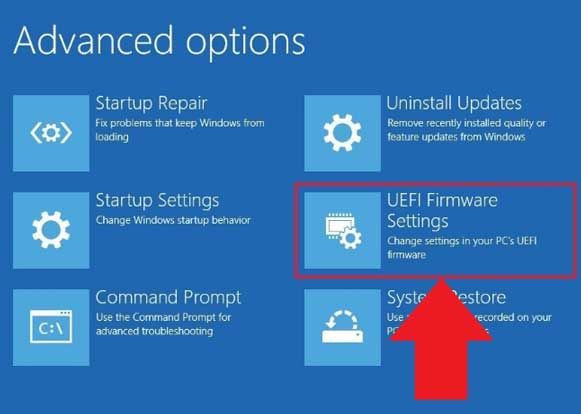
If Virtualization is disabled, you must enable it from your BIOS or UEFI settings. You can get to the BIOS by pressing the BIOS key on the startup logo screen. The keys for some motherboards are:You can also access UEFI through the Advanced Startup Options. To do so:How you can enable Virtualization depends on the motherboard or PC you have. You can find the VT-x option for most processors inside the UEFI’s Advanced tab (in Advanced mode). If not, look inside the CPU Configuration, Security, or Overclocking tabs to find the VT settings.To enable hardware virtualization, the option you need to enable is Virtualization Technology, VT-x, or SVM. You can also enable Virtualization for Directed I/O, VT-d, or IOMMU to allow VMs to access your I/O devices properly.If you have any problem enabling VT-x in BIOS, you can visit our dedicated article on How to Enable Virtualization to find the necessary steps. You can also seek help from your motherboard’s official website.
Disable/Restart Hyper-V Feature
Oracle VirtualBox v6 has introduced experimental support for Hyper-V. But all previous versions conflict with this feature. So, for earlier VirtualBox applications, you need to disable the feature using the steps below:If you have VirtualBox v6+, you can try resetting Hyper-V to fix any bugs causing compatibility issues. Here’s how you can do so:If you have multiple OS, you need to enter your current identifier as well. For e.g., bcdedit /set {current} hypervisorlaunchtype off
Check VT-x in VirtualBox Settings
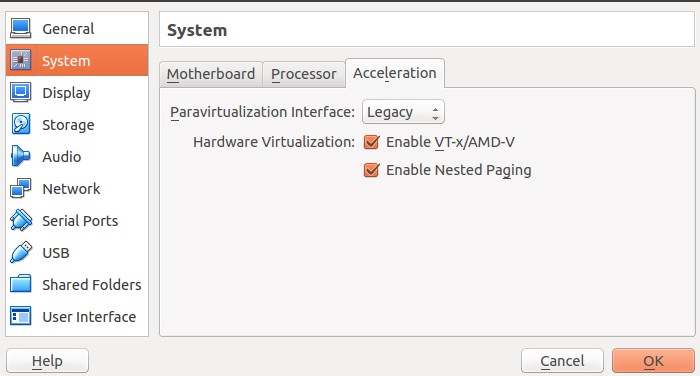
Another configuration you need to check is the VT-x setting of your VirtualBox VM. Here’s how to access this setting:If you are running a 32-bit system and your BIOS Virtualization setting is Off, uncheck Enable VT-x/AMD-V. Otherwise, make sure to enable it.
Check PAE/NX Setting for VirtualBox VM
A 32-bit OS can only access up to 4 GB of RAM or physical memory by design. To access more than 4 GB RAM with such OS, you need the Physical Address Extension (PAE) feature. And with PAE enabled, you need NX to run the 32-bit OS in protected mode.If you are setting up a 32-bit guest OS on VirtualBox, you must enable PAE and NX on both your host computer and the VM settings.To enable them on your PC:Now, enable PAE/NX on your VM settings using the steps below:If you are running a 64-bit guest OS, enabling PAE/NX will instead cause this VT-x issue. So, disable the option using similar steps. You only need to do so from the VM settings, not your host PC.
Reallocate VirtualBox VM RAM Size
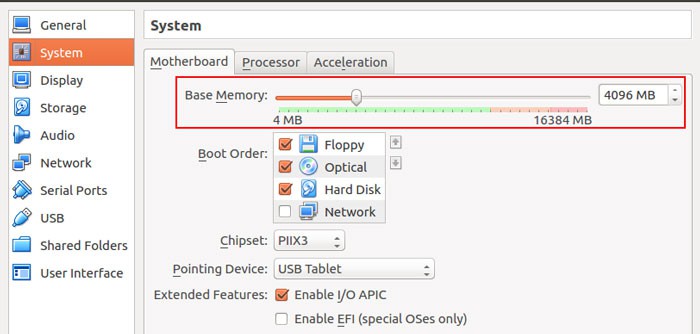
An alternative to the solution just above is to reallocate your RAM size. As mentioned earlier, without PAE, you’ll get this error if you try to run a 32-bit OS with more than 3584 MB RAM.To resolve this issue, you can set its RAM to 3584 MB or below using these instructions:If you are using a 64-bit guest OS, low RAM is actually a hindrance. Some users have reported that they encountered the VT-x is disabled in BIOS error with low RAM. In this scenario, you need to increase the VM’s RAM allocation.
Install / Reinstall HAXM (on Android Studio)
If you have enabled VT-x and VT-d in BIOS and the Hyper-V feature is Off, the only remaining cause for this issue on Android Studio involves bugs with the HAXM program. It is also possible that you haven’t installed the program at all.To install Intel HAXM,If it’s already enabled or enabling it doesn’t help at all, you need to install the latest version. First, uninstall it using the steps below:Then, download and install the latest HAXM from the GitHub page.
Disable Security Applications and Processes
It is also possible that some third-party security application is blocking the VM’s access to Virtualization resources. So, disable all third-party security software on your PC and check if the issue resolves. You can also try clean booting your OS to see if any other apps are using the VT-x resources.Your computer also uses VT-x for the following security features:
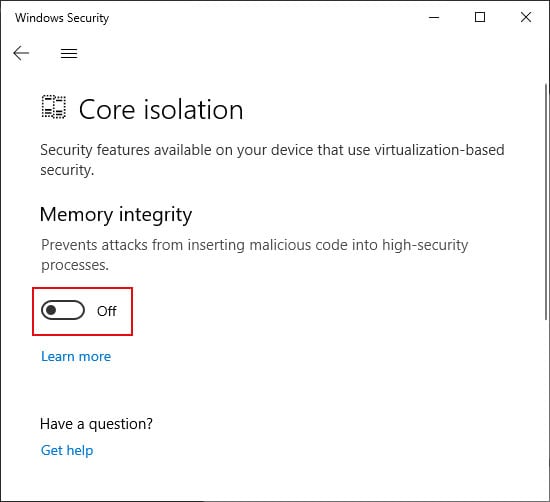
Device Guard and Credential Guard.Core Isolation and Memory Integrity.
You can try disabling them as well. To disable the first feature,To disable Memory Integrity:
