These additional USB ports on your monitor can be very useful once you start to get the hang of it. Pairing these USB ports to that of your CPU allows you to connect a plethora of devices and external peripherals to your computer.So, here in this guide, we talk about different types of USB ports present in your Dell monitor and their respective functionalities you can exploit. By the end of this guide, you’ll be able to fix these USB ports and see them operate at their full capacity. So, let’s begin!
What Are Upstream and Downstream USB Ports?
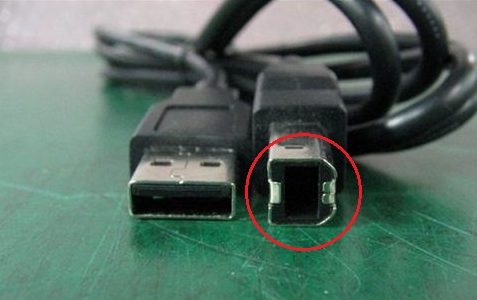
Before we jump directly into the fixes, it’s important to know the type of USB ports available on most monitors. As mentioned above, a Dell monitor consists of an upstream port and multiple downstream ports. Although both of these are responsible for carrying data between the monitor and connected devices, the core idea between them is somewhat dissimilar. An upstream port is responsible for receiving data and power from another device. So, in terms of your monitor, the CPU acts as a host and your monitor draws power from it through this upstream port. USB Type-B is the general connection method for an upstream port. However, a downstream port is slightly different as it is used to send data and power to a connected device or to an upstream port. So, the downstream port powers up connected peripherals like keyboards and mice, and transmits data to ensure that these devices operate effectively. USB Type-A is the general connection method for a downstream port.
Why Is My Dell Monitor USB Port Not Working?
How to Fix My Dell Monitor USB Port?
So, now that we have gone through the basics about your monitor USB ports and the factors that lead to their failure, we’ll start looking at the fixes. The methods listed below are pretty simple, easy to understand, and easy to follow.
Connect Devices in a Proper Way
When trying to operate a Dell monitor’s USB port, most users miss out on the use of upstream ports. It’s important to note that upstream and downstream ports have different functionalities and hence, they should be used together in a different manner. The steps below show you how to connect devices to your monitor’s USB port in a proper way.
Download the Required Drivers
Once you connect the devices in the right order, more often than not, Windows will fail to recognize the device. You might also get a USB device not recognized error prompt. So, this suggests that the drivers for the USB hubs of your monitor are not present on your computer. Hence, search for and download the required drivers using your monitor’s model name and number on Dell’s official support site.Once the download process completes, copy this file on a USB drive and set it up on your system.
Update the Drivers
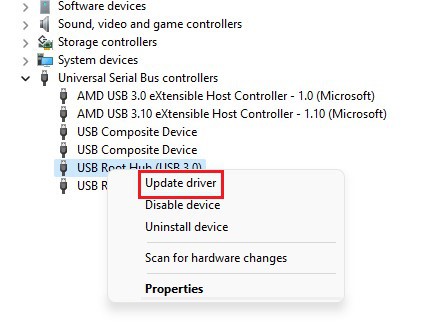
However, if the drivers you previously installed turn out to be outdated, you have to replace the related installation files with a fresh one. A fresh copy of the installer’s files can also remove any bugs and glitches that were present within the previous build. So, updating your drivers does just that and might hence fix your problem. For this,
Modify the Power Saving Setting
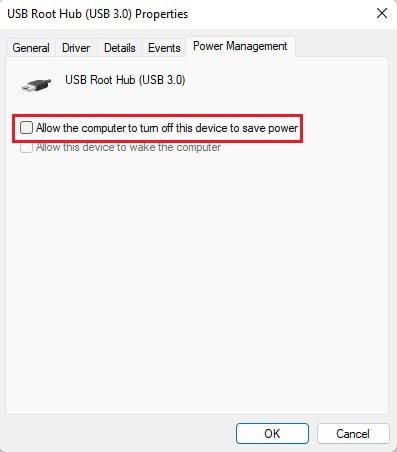
At times, the Windows power management setting is known to turn off certain USB ports in order to save power. So, in order to prevent this from happening, you can disable this power management feature for your USB root hub, either temporarily or permanently. The steps below show how to do this.
Perform a Diagnostic Test
Dell provides its customers with its official diagnostic tool to help users diagnose and optimize their devices. It aims to make your PC run at its full potential with frequent hardware and software tuning. You can view, download and install the latest device drivers through this tool as well.Once you download this application, follow the on-screen procedure to efficiently diagnose your USB problem.
Reset BIOS to Default
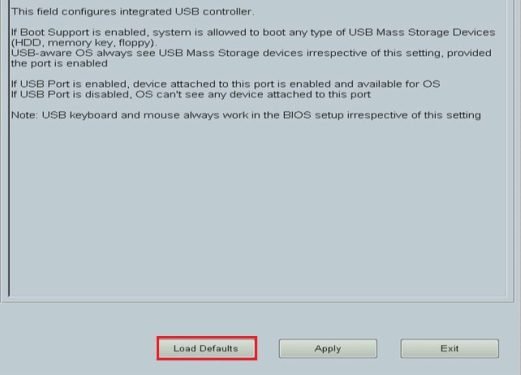
In cases where various BIOS settings were previously changed, you can reset the BIOS to ensure that each setting is set back to the factory default. Once you load the defaults, you can then check if the USB device is enabled on your device or not. The steps below show you how to do so.
Enable USB on BIOS
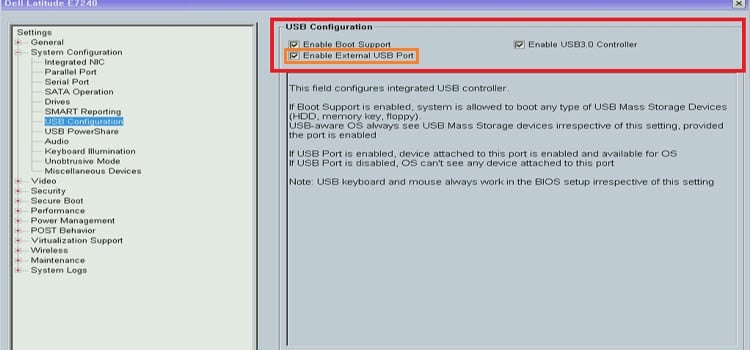
A reason for your Dell monitor USB ports failing to operate may be because these ports are disabled on the BIOS. Whether these settings were unknowingly misconfigured by you or the motherboard disabled it automatically, you have to re-enable this BIOS setting. So, for this:
Update BIOS
An updated BIOS aims to fix all the bugs that could have existed on the previous motherboard build. Also, an outdated BIOS could cause various compatibility issues between your hardware device and it software interface. So, not only will updating the BIOS return it back to its default settings but will also see that your monitor ports are operating properly. Keep in mind that updating your BIOS is a risky process. Luckily, we have a dedicated guide on how you can safely update your BIOS. Check it out for a more detailed understanding.
Repair Hardware Malfunctions
If none of the aforementioned steps work, then this might be a case of an unfortunate hardware malfunction. You can check if your USB cables are working properly or not by carrying out the above processes on another device. If the cables work smoothly on another monitor, then the problem might lie with the USB port itself. So, take your monitor to the nearest repair center and find out what’s wrong with your device.
