Due to its ambiguous nature, there are an almost infinite amount of possible causes behind it, turning the troubleshooting part into an exhausting process.However, through extensive research, we’ve gathered a list of potent solutions that can help successfully solve the Kernel-Power 41 error with little effort. Even if this isn’t your first time encountering the error, there’s a high chance one of these solutions will work for you.
What Causes Kernel-Power 41 Error
The error is mostly associated with a faltering power supply. Your PSU serves as the lifeblood of your computer, so when it fails to adequately supply power to the CPU and other crucial components, your computer will start to act up. Of course, little can be done here except for a replacement. Other parts of the PC, both hardware and software, can also contribute toward the Kernel-Power 41 error. These can include:
Fixing Kernel Power 41 Error
The following solutions assume that the issue lies within the software rather than your hardware. Make sure to thoroughly test your components beforehand. Faulty parts are essentially a lost cause so assuring this early on in the troubleshooting journey can save you from the hassle later on.
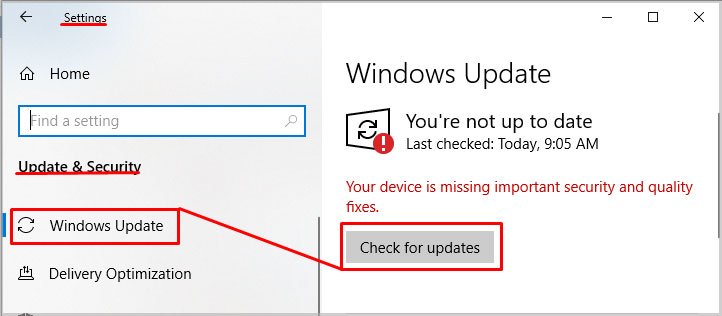
Update Windows
Staying behind on Windows updates is a leading cause behind Kernel-Power 41 error. Microsoft has actively stated that certain Windows builds are plagued with this error so installing any pending updates is necessary to alleviate the issue.If any updates come up, download and install them at the earliest. If you’ve already downloaded the update and are putting it off then restart your computer to install it right away. However, if your PC is up-to-date then move along.
Update All Drivers (or Disable a Few)
Similar to Windows, you should always keep your drivers updated. Misconfigured, corrupted or even outdated drivers can cause the Kernel-Power 41 error in some cases. The ACPI driver is by far the most prevalent culprit here so start from there.You’ll be greeted with the Update Driver Wizard, proceed with the “Search automatically for drivers” option. Follow the on-screen instructions and once the driver(s) has been updated, restart your computer.Likewise, if you have any devices, after installing caused the issue, then uninstall or disable them to prevent interference. Simply select “Uninstall device” or “Disable device” after right-clicking the driver in Device Manager.Use your computer like usual and if you don’t encounter the Kernel-Power error in the timeframe you previously would, voila, your problem is solved!
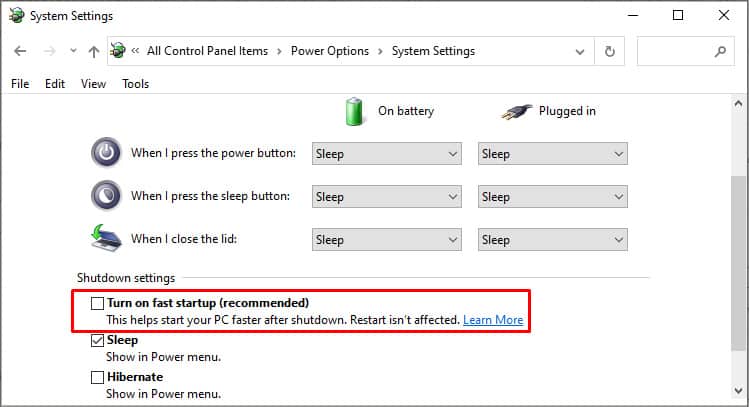
Turn Off Fast Startup
Fast startup puts your computer in a state of deep sleep that doesn’t fully shut it down. This makes system power-ons faster but can sometimes cause issues with the computer not being able to start (or shut down) properly, which can, in turn, create the Kernel-Power 41 error.To turn off Fast Startup:Take note that your computer will take longer to turn on after this but hopefully the Kernel Power error will have been resolved.
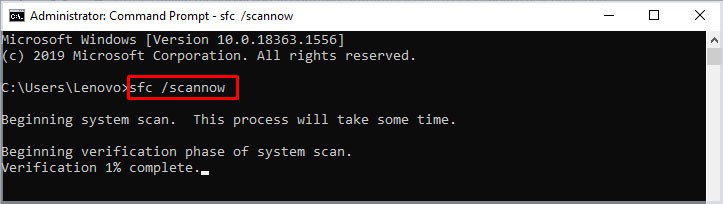
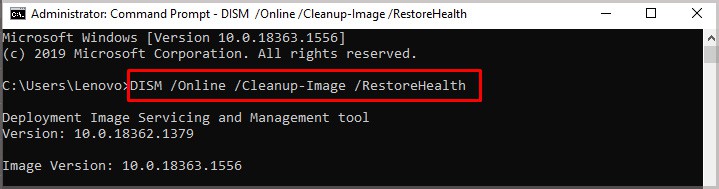
Run Repair Scans
There are a bunch of built-in repair utilities in Windows that can help you solve the Kernel-Power 41 error. We’re going to use three, starting with the SFC and DISM scans.The System File Checker (SFC) and Deployment Image Servicing and Management (DISM) scans check all critical system files to identify any broken, corrupt, or misconfigured ones. Then fixes are automatically applied to them where possible. To run the SFC scan:To run the DISM scan:First run the SFC scan, then restart your computer then follow up with the DISM scan and restart once again. Lastly, you’ll have to run the CHKDSK scan which looks through a specified disk to spoof out bad sectors or any other issues and fixes them:After the scan is complete, restart your computer and check if the issue has been addressed successfully.
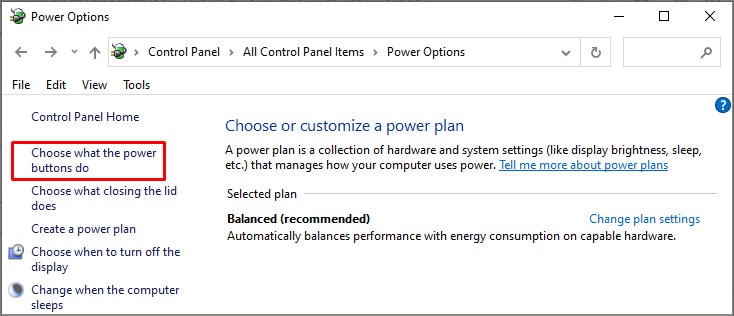
Change Your Power Settings
Power settings dictate how your computer uses power. While most of the default settings within Power Options are harmless, they can still provoke the Kernel-Power 41 error if they’re not configured correctly. We need to first change the hard disk power setting:Then, we need to change the Sleep setting:Restart your computer and see if the issue still persists.
Remove Antivirus Software
Windows Defender, the built-in antivirus protection from Microsoft is more than enough to safeguard your computer against malware. Third-party antivirus software can often interfere with vital settings and cause issues, such as the Kernel-Power 41 error.If you have any third-party antivirus such as Avast, AVG, Norton, McAfee, and many more, uninstall them:Depending on the software, you may need to uninstall it through its own wizard to remove all components. Make sure to select the option that completely wipes all data pertaining to the software from your computer.
Disable Overclocking
This only applies to users who have active overclocking on their computer, whether that is on your CPU, graphics card, or memory. XMP memory profiles are one of the most common triggers of Kernel-Power 41 so turn those off entirely if you have them enabled.Likewise, if either your or your GPU or processor is overclocked, turn off all overclocking through the BIOS. Overclocking often messes with the flow of power in your device which is the main reason behind Kernel-Power 41’s occurrence.
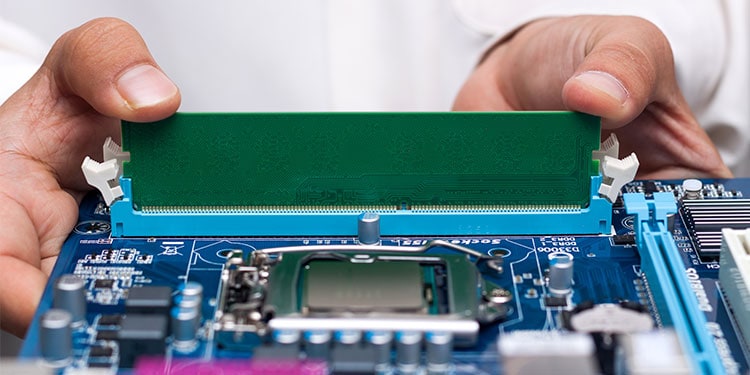
Reseat Your Ram and Graphics Card
Sometimes, simply taking out something and putting it back in can fix the issues with it. The reseating solution works in mysterious ways for many things with the only explanation being that dust accumulated over time can get cleared out this way. The same is the case with Kernel-Power 41.Your RAM is most closely associated with the Kernel-Power 41 error, but it’s good practice to reseat your GPU as well. We suggest you get these things done by a professional if you’ve never done it before. Otherwise, you can look up instructions online and follow along carefully.
Update BIOS
This is technically the last resort for solving the Kernel-Power 41 error. If nothing worked for you then it’s time to update your BIOS. Again, this is something best left to the professionals but you can update your motherboard’s yourself easily.Simply visit the website dedicated to your motherboard’s specific model, go to the support/downloads page and download the latest BIOS file from there. Then you’ll need a flash drive to put the BIOS file in. The final step is to boot into the BIOS, select the update bios option and stick the USB in. The motherboard will handle the rest by itself and automatically update the BIOS. However, if even this doesn’t fix your issue then the only option left is to get your PC checked by an expert.
Check Your Power Supply and Motherboard
Before you do that, thoroughly inspect your power supply and motherboard for any damages of sorts. If you notice anything odd, especially something like an error code on your motherboard, don’t hesitate to look it up. Check for overheating as well and ensure that all power connectors are intact. If you have a modular power supply, re-plug each connector just to be on the safe side. PSU stress test tools like OCCT can also be utilized to check if the power supply is stable.If everything is fine but you still keep encountering Kernel-Power 41 error then our troubleshooting journey comes to an end here.
Related Questions
I Have Tried Everything but Kernel-power 41 Error Is Still Persistent, What Should I Do?
If you’re on Windows 11, you can try running the built-in Power Troubleshooter but if you’re on Windows 10 then you’re out of options. Sure, there are a billion random things you could do to potentially solve the issue but the practical troubleshooting ends here. You’ll need to take your computer to a professional to get it repaired.
What Is Kernel-power 41 (63) in Event Viewer?
Kernel-Power errors are critical errors within Windows that are logged into Event Viewer upon a random crash, system freeze, restart or shut down. It means that your computer randomly stopped receiving adequate power or one of the components failed to properly communicate with each other.
Is Kernel-power 41 Error Dangerous?
Kernel Power 41 highlights a critical problem within the system that needs to be fixed for the PC to function properly. It’s basically the fever of computer errors, meaning that it tells you something is seriously wrong with your system that you need to figure out on your own.