Auto HDR displays a richer shade of color with vibrant palettes, making the image on the screen feel more sharp and dynamic. The quality of HDR seen on the screen depends entirely on the quality of your monitor. Nevertheless, Windows offers you the ability to turn on Auto HDR which can be accomplished directly through the system settings. This guide is directed toward helping you understand the basics of Auto HDR and the process to enable it on Windows 11. So, without waiting any longer, let us begin!
How Does Auto HDR Work?
Auto HDR brings your game to life by converting the SDR (Standard Dynamic Range) image to HDR (High Dynamic Range). This is done by upscaling the display attributes. For instance, the brightness, contrast, and color of the image seen on the screen. Enabling Auto HDR makes the highlighted part of an image brighter and more detailed. Similarly, the shadows are made darker and more detailed as well. The data between these extreme points are made sharper with a dynamic color range. So, Auto HDR shows off an intense tone with a wide array of colors.
Prerequisites
Auto HDR provides a wider range of contrast and vibrance to make your game feel graphically dynamic. However, before enabling Auto HDR there are some prerequisites you have to consider.
How to Enable Auto HDR on Windows 11?
There are a few different methods that you can follow to turn on Auto HDR on Windows 11. All of these processes can be completed with only a few taps of buttons. Once enabled, you don’t have to ‘re-enable‘ it after every Windows startup. Windows will then automatically apply HDR to games that previously did not support this feature.
Enable HDR Using a Shortcut Key
This method is not talked about much, but it’s the fastest one to apply. A shortcut key combination is available in Windows 11 to quickly enable or disable the Auto HDR. That is, you can press the Windows key + Alt + B on your keyboard to toggle the Auto HDR feature. However, it might take some time for your system to enable HDR, and your screen might go black for a few seconds. Nonetheless, once it’s back on, you will immediately notice a change on your screen with brighter and more sharpened colors.
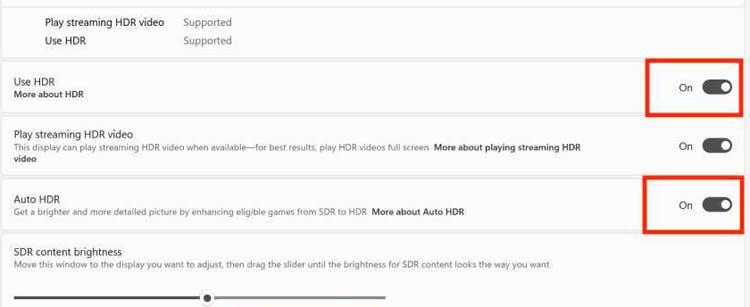
Enable Auto HDR Through the Display Settings
Auto HDR can be enabled through the Windows 11 display settings as well. This method directs the workflow to the settings app, and here, you can alter the HDR settings easily. The steps shown below describe how to do so.Additionally, you can adjust the HDR intensity using the slider that’s under SDR content brightness.
Enable Auto HDR for a Specific Application
Furthermore, you can enable the Auto HDR option that applies only when you’re in a particular game/application. This can be achieved either through the game bar or in-game settings. Doing so will toggle back the Auto HDR option once you close off the particular application. Both of these procedures are talked about in brief below.
Using the Xbox Game Bar
This is a user-friendly method to turn on Auto HDR if you are in-game. Using the XBOX Game Bar will not pause or take you out of your gaming session. But, this will only enable HDR until you are on the specific application. Closing the application disables this HDR feature. Hence, you can enable the Auto HDR feature using the steps shown below:Additionally, you can click on Adjust HDR Intensity to reveal a slider that you can use.
From in-game Settings
Newer games that support HDR often have HDR-related options in their in-game settings. It’s usually under the video/graphics/display settings of your game. Simply toggle on the HDR feature and continue to your game.Similar to the aforementioned process, this will enables HDR for that particular game only. The changes are not carried outside this game or to other applications.