To get the best gaming experience, you must have a good gaming setup and monitor setting to match it. Monitor Adjustments refer to changes in resolution, refresh rates, enabling screen tearing removal technologies & calibration. These are some of the most important factors, but there are others too. We have compiled a list of factors to consider. Check them one by one and adjust your settings accordingly.
Best Monitor Settings for Gaming
We will start with the main things and move on to complimenting factors. Check these settings parallelly, and by the time you finish this article, you will be set to start gaming.
Start by Factory Reset
We recommend starting with a factory reset. The reset will bring the monitor settings to the manufacturer’s exact settings. Think of it as creating a blank canvas for you to customize.We can do the reset through the on-screen display menu with the help of the monitor’s buttons. The exact placement of this option can vary from monitor to monitor. Try to find yours and set it to factory settings.
Manage Resolution to Your Gaming Needs
Every monitor has a combination of horizontal and vertical pixels. You can check these resolution combinations through the display settings. Remember, we cannot change the max resolution of the monitor. We only get to choose the given combinations. Now, if you are gaming, two factors will come into play.
Speed/ ResponseQuality of visuals
We recommend not focusing much on high resolutions for Gamers that emphasize competitive or online gaming. Speed is the most important factor in these games.Try to find a sweet spot where speed is not sacrificed, and you still maintain a usable resolution. Follow the steps to check and adjust resolution:
High FPS Games
Professional high FPS gamers will generally play with low resolutions like 1920*1080 on small size monitors (24-27 inches).This will be a trial-and-error process for you as we do not know what setup you have. Try playing with high resolutions and drop it down if you feel at a disadvantage.This resolution trick will be applicable for games like COD, Overwatch, Valorant, or any game where split-second decisions can get you the win. In simple terms, these players sacrifice resolution for speed.
High Graphics Games
We recommend bumping the resolution to its highest capacity for gamers who are into more immersive role-playing games like The Witcher, Red Dead Redemption, Elden Ring, or God of War. These games would be no fun with low graphics and resolutions.Remember, the higher the pixels, the more strain it will impose on the graphics card. If you plan on playing games at 4K, you will need a current powerful graphics card at least equivalent to a GTX 1080.
Set Refresh Rate to the Highest Possible Rate
Refresh rate is the rate at which the monitor refreshes its total pixels in one second. High refresh rates mean that the monitor can refresh and show new visual information faster. Higher the refresh rate, smoother the performance in gaming.Every monitor will have a maximum refresh rate. Consider the maximum as the ceiling that we cannot change. We recommend setting them to the highest possible number for the best experience.
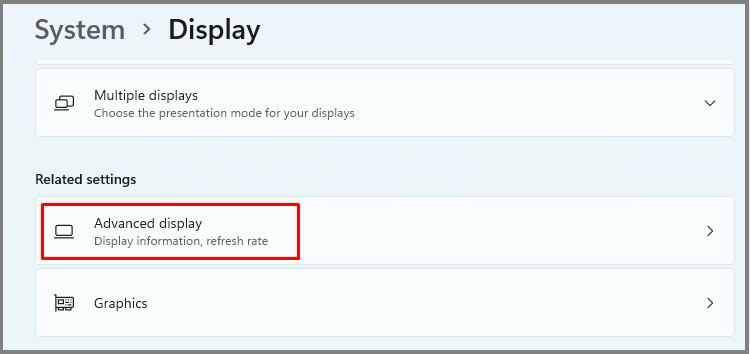
Go to your desktop wallpaper area and right-click on it.Select Display settingsGo to Advanced DisplayFind/select the option Choose a Refresh Rate and select the highest possible refresh rate.
Alternatively, you can directly go to display adapter properties for Display N (N is the display number) and choose List all Modes. A list of combinations of resolution with refresh rate will pop up. Try choosing the highest possible combination.A 60 Hz refresh rate should be the minimum baseline in today’s standard. We recommend monitors with at least 144 HZ or more if you ask us.If you have multiple monitors set up, we recommend moving the game to the monitor with the highest refresh rate.Do not approach refresh rate as a fixed rate. Think of it as “at what resolution can I maintain a particular refresh rate while using a particular port on the graphics card?”
The monitor should have a high refresh rate. The Graphics card and its ports should support the stated high refresh rate The cable connecting the monitor to the graphics card should transfer the needed speed.
We have a designated article talking about maintaining 144hz through HDMI. We recommend checking it out. The same concepts apply to higher refresh rates. Once you understand its core concept, it will be with you for life.
Adaptive Sync Technologies
If your monitor is G- Sync or free Sync categorization, we recommend enabling it. Adaptive sync technologies help in reducing screen tearing and shuttering issues during gameplay. It utilizes a variable refresh rate system where the monitor’s refresh rate gets controlled according to the frames rendering output of the graphics card. Please check the driver requirements for Gsync compatible monitors. Before turning G-sync on through the control panel, check the OSD settings of your monitor and turn on adaptive sync/ DDC/CI / Free sync (whichever is listed).
For Nvidia users
For AMD Users
AMD users get their own version of adaptive sync called Free Sync. We recommend checking their official website to enable the Free Sync on your monitor.
Overdrive Settings
Overdrive pushes the monitor’s response time which in turn helps in reducing any ghosting or trailing problems.Unfortunately, you can only use overdrive if your monitor has overdrive features. We recommend checking the monitor specifications for these settings.Please check your on-screen display menu with the help of the buttons present on the monitor. Monitors usually list it as:
OverdriveODResponse timeTrace free
We consider this to be crucial if you are using adaptive sync technologies. As most monitors with adaptive sync technologies use Variable refresh rates, overdrive is needed to balance things out.Adaptive sync technologies make the monitor work for the graphics card. It adjusts the refresh rate according to the frames produced by the graphics card. So there might be a lot of jumping up and down in terms of refresh rate.The monitors that use adaptive sync technologies also tend to have a lot of refresh rate capacity. E.g., Check out the G-sync monitor’s list from NVIDIA. Most high-performance monitors will have variable overdrive features.Overdrive is needed to balance this variableness. We have a specific article on enabling overdrive in monitors. We recommend reading it thoroughly before tinkering with overdrive settings. This is crucial as using overdrive to the extreme can create another problem called inverse ghosting issues.
Calibrate the Monitor
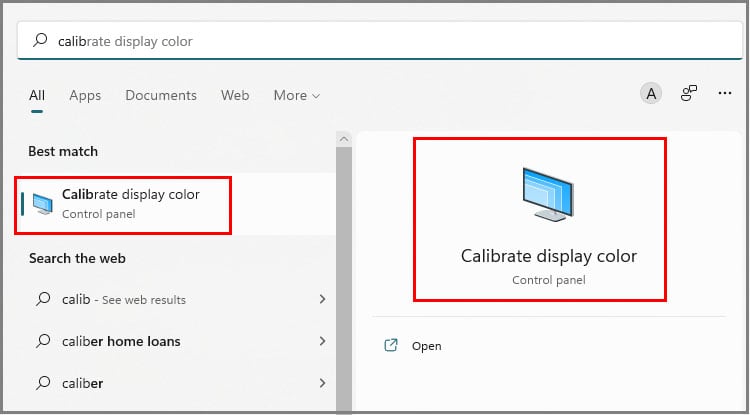
Under normal circumstances, most of us won’t even care about this. But if you are a hardcore gamer that needs the perfect color combinations, then this is a must.You can calibrate monitors through the following methods:
Calibrating hardwareCustom ICC profiles for the specific monitorWindows designated tool for calibrationOnline websites
You can directly calibrate the monitor for normal users through the windows tool. A big downside to this is that we use our eyes to calibrate the monitor, so chances of human error increase drastically.There are also calibration websites with test images that we can take as a reference point. You can use your monitor OSD settings simultaneously while using these test images to calibrate the Display.There are also plenty of already configured color profiles on the internet. These files have stored color information as a series of numbers that can be downloaded and used for your monitor. We recommend googling profiles on the internet. A lot of websites are dedicated to creating such profiles. Hence, the best method is to use a hardware colorimeter or spectrophotometers. We can plug these devices into the computer and place the calibrating machine on the monitor. You will also need to install its driver.Both hardware devices have their strengths and weaknesses. Colorimeters are good at handling a wide range of luminances, low light readings, and contrast measurements. Spectrophotometers are more accurate in color readings but aren’t that good for low light readings. In terms of prices, Colorimeters will be far cheaper, ranging from around $100-$200 for entry-level devices. Spectrophotometers generally start around $1400-$2000. It might exceed the price of the monitor itself. Unless you have money lying around, we recommend getting a colorimeter.This hardware does come with a price, but some electronics shops also rent it out. We recommend checking it out.You will also need a calibrator software. Professional paid tools are available like Calman, but we recommend free software like Display Cal for entry-level gamers.
Sound Settings
Some monitors come with an inbuilt speaker. Under normal circumstances, we recommend using gaming headphones or speakers, but if you do not have them, this might be the only option. Turn the sound on for these monitors to get audio.
Brightness, Contrast & Sharpness
These settings will depend on personal preferences. You can adjust the brightness, contrast, and sharpness according to your liking via the on-screen display menu on the monitor. There is no universal formula to this. Put the brightness and contrast in a setting that you are most comfortable with. As games generally run for hours, the setting should be centered toward your preference.Alternatively, go to settings > display in windows and adjust the brightness.Excess brightness or contrast might cause eye strain, so be wary about the effect of the setting on you.
Blue Light Reduction
Under normal monitor settings, the monitor will exude blue light. We can reduce this by enabling blue light reduction from the on-screen display menu on monitors or through night mode in the windows operating system.Try to find the setting through the OSD settings first; else, move on to the steps below:You can also schedule the night light to automatically run-on custom hours or from sunset to sunrise. Do what is comfortable to you.
Black Equalizer
This setting aims to brighten dark areas without compromising lighter areas. During a game, you will have both light and dark sides; a black equalizer, as the name suggests, lightens up the black or darker areas. The exposure of the lighter areas does not increase and stays the same.This setting can give you a competitive advantage when playing high FPS gun games, as you will be able to spot enemies easily. This option will be in the monitor’s on-screen display menu if available. Check yours and turn it on.However, for immersive games, we recommend turning them off. It ruins how the game was supposed to be played. You aren’t limited to split-second decisions like real-time high fps gun games, so enjoy the visuals.
Conclusion
Let us know the only way to find the best configuration for you. Let us know what kind of gaming settings you use that get you the best gaming result.