In such cases, it’s better to fully optimize the system so that you can use it longer and better. You can also get faster internet and networking services by optimizing certain components. Similarly, if you want to increase the frame rate while playing games, it’s a good idea to optimize your PC for performance.With a low-end system, you will be able to squeeze out more of your computer. And even with a high-end device, higher performance is never unwelcome. There are many, many ways through which you can optimize your Windows. So, we have only included the most significant ones in this article.
How to Optimize Your Windows?
You can optimize your Windows both for better performance and for a better working experience. In this article, you can find the methods for both optimizations.Windows 10 and 11 may have slightly different steps for the methods. Here, we only include the steps for Windows 11, but you can adjust the setting on Windows 10 in a similar way. However, if there are many differences between the two operating systems, we have listed the steps for both systems.
Use SSD for System Drive
No matter how much you try optimizing your computer, it won’t come close to the performance boost you get after using a solid-state drive (SSD) as the system drive instead of a hard disk drive (HDD).So, if you already have an SSD but your operating system is stored on the HDD, we recommend formatting your drives and installing Windows on the SSD instead. If you don’t have an SSD, it’s better to add an SSD to your computer and install Windows there.
Enable System Protection
The first thing you should do is check whether system protection is enabled on your system or not. This is necessary to run System Restore, which allows you to safely revert your system back to a stable condition whenever it experiences any issues.You should also create a restore point at the same time before applying other solutions just to be on the safe side.Here’s what you need to do:
Change Visual Effects
The Windows user interface contains many visual effects, which you may not always need. These effects use a little bit more of your system resources. Additionally, as they are visual improvements, they don’t affect your regular activities so you can safely change them.So, it’s better to go through the options and only enable those you need to optimize your Windows experience. Here’s how you can do so:
Modify Virtual Memory Settings
Windows reserves some space on your hard drive to create a pagefile.sys file, which acts as the virtual memory. Your system uses this space in a similar manner to the RAM whenever the RAM gets used up completely. Or it may use this space to prevent the high usage of RAM in the first place, avoiding any non-paged memory errors.Microsoft usually sets an optimal configuration for the Virtual Memory. However, depending on your computer specification, you might want to customize your settings a little bit. Follow the instructions below to do so:
Change Boot Time from System Configuration
You can also change the startup time in your system. There are mainly three things that affect this time,
The total number of processors your computer uses to boot up.Whether the computer displays the booting process in a Graphical User Interface (GUI).The timeout period of the boot.
Generally, your computer automatically uses the maximum number of processors to boot up. However, sometimes it may not do so, so it’s better to manually set such a configuration.Also, while changing the timeout period, if you set it too low, your computer will crash on every boot. So, make sure to create a restore point first. Then, use the following steps to change the boot time:In some high-spec computers, you may also be able to set this value to 3 or 5 seconds without any problems.
Disable Services
Your computer runs many services in order for the system and some applications to run properly. However, you don’t need all the services to be running on your system. You can check which ones are unnecessary and disable them to boost your performance. Here’s how you can disable the services.
Disable Startup Apps
Now, the next thing to do is disable the startup apps. Windows automatically configures certain apps to run at startup, and it is also possible to set an app as a startup app during its installation.So, even when you don’t need them, some programs automatically run after you log in to an account and use up your system resources. You can check for such applications and disable them using the steps below:
Uninstall Unnecessary Programs
If there are certain programs you don’t need or use, you might as well uninstall them instead of just disabling them as startup apps to free up your storage space. Here’s how you can do so:You can also debloat your computer of unnecessary programs that come preinstalled with Windows in the same way. If you can’t uninstall some store apps, you need to use the Remove-AppxPackage cmdlet on PowerShell. We recommend you refer to our dedicated article on Debloating Windows to learn the complete process.
Switch to Lightweight Apps
The most popular apps are usually popular because they provide multiple features and options. However, the majority of people do not use such features.In such cases, rather than using such heavy apps, you can move on to lightweight software which you can make full use of. For instance, you can use free lightweight PDF Readers such as Sumatra PDF or Slim PDF instead of Adobe Reader.You need to search on the internet for such alternatives and check the official sources to understand the full range of their services before switching to those apps.
Use 64-bit Apps
If you have a 64-bit system, running 64-bit apps is more optimal than running 32-bit apps. The 32-bit programs can only use up to 4 GB of RAM, so you can’t make full use of your resources if you have higher RAM.So, it’s always better to download 64-bit applications. The installers should show (x64) for 64-bit software and (x86) for 32-bit software, so check and download carefully before downloading them.If you don’t know whether you have a 32-bit or 64-bit system,
Set Proper Power Plan
Another thing you can do to optimize your computer is to customize your power plan according to your preference. This allows you to enhance the performance of certain components of your computer while restricting those you don’t need for more efficiency. Here’s what you need to do:
Check Display Settings
If you want a good gaming experience or even when you use the computer for other work, you need to set the optimal display settings on your system. Follow the instructions below to do so:
Enable/Disable Hardware Accelerated GPU Scheduling
Some computers also include a Hardware Accelerated GPU Scheduling option. Enabling it allows your computer to use the GPU instead of the CPU for certain heavy-duty tasks such as rendering normal displays or videos and so on.This substantially improves your performance if you have a good graphics card. To enable this setting,
Set Graphics Preference for Apps
Usually, your AMD or NVIDIA graphics cards select which graphics card to use for which applications. However, you can change it from your settings and make the less intensive apps use the integrated GPU, and the resource-intensive ones use the dedicated GPU. To do so,
Notifications and Popups
Windows keeps on popping up notifications whenever you or your system perform any task. These notifications can be distracting, and you don’t really need them anyway. So, it’s better to disable them altogether. Here’s how you can do so:
Change Multitasking Settings
Windows also includes a Multitasking setting, which is basically just a snap-in or snap-assist feature. It lets your Windows snap to one side or corner using the Windows + arrow keys and allow selecting which app to show in the area left after snapping a window to a side.If you don’t use snap-ins, you can disable the feature using the steps below:Even if you use this feature, you can still see what each option does by enabling/disabling it and only keep the options you prefer.
Disable Shared Experiences
Windows also includes the Shared Experiences feature that allows you to remotely control apps on the system from another device connected to your account. However, very few users use this service. If you are not one of them, you can disable it using the steps below:On Windows 10On Windows 11
Change Privacy and Diagnostic Settings
Windows allows you to enable/disable many privacy options, such as tracking your activity to provide more relevant suggestions or allowing Microsoft to access your diagnostic data. While these features help Microsoft better understand its user base and tailor better services and apps in the subsequent Windows releases, hackers can exploit them to get access to your system and data.So, we recommend disabling all such permissions if you want to improve your security. It’s better to do so anyway, even if you are not worried about the security risks, as such feedback and tracking also use up your system resources. To change such permissions,
Modify App Privacy Settings
You can also allow or restrict your apps from accessing particular resources, such as microphones, locations, etc., on your system. As with the earlier case, providing full permissions can make your computer vulnerable to threats.So, it’s always best to keep such services disabled normally and only temporarily enable them when necessary. To disable the app permissions,
Change Game Bar Settings
Windows also provides a Game Bar setting for a better gaming experience, overlays, and recording. However, the dedicated applications of NVIDIA or AMD do that anyway while also providing many additional features.Most people also use other software for recording the gameplay, so we recommend you disable the default game bar setting on Windows. To do so,
Configure Storage Sense
Storage Sense is the new alternative to the traditional Disk Cleanup tool. You can easily schedule regular cleanups with this feature, so it’s better to enable it and customize the preferences for the cleaning process. Here’s what you need to do:
Disable SysMain
SysMain is a feature that aims to improve Windows performance by pre-loading apps you frequently use on the RAM. While it does somewhat improve system performance, it does nothing to boost the performance of foreground apps, especially games.It instead hinders them as your system allocates some resources to load even those apps you don’t need currently. This service can also use up a lot of your CPU’s processing capacity, leading to lags and stutters.These issues are not so prominent in an SSD, which is already very fast and efficient. However, if you use an HDD, we recommend disabling this service, especially while playing games. Here’s how you can do so:
Disable Search Indexing
Search indexing is a feature to collect, parse and store data for faster searching. However, this feature is only effective if you have a good CPU and use hard drives.If you have a slow CPU, indexing will affect your performance as the service will use up a lot of CPU resources when you want to run other tasks.And if you use an SSD, even without indexing, searching is very fast, so this feature is redundant. So we always recommend turning it Off in such cases. Here’s how you can do so:
Change Enhance Pointer Precision
Your Mouse Pointer Options include a setting to enhance pointer precision. This option makes it easy to navigate the Graphical User Interface (GUI) and get the cursor to precise positions while typing. However, it may stop you from moving as you wish, especially in shooting games.So, we recommend disabling it while playing games and enabling it at other times. Here’s how you can disable it:
Defragment Hard Drives
When you store files on a hard drive, your system searches for consecutive free sectors. If it fails to find any, it fragments your data and stores them in randomly-distributed sectors, causing lags while accessing the files. So, you need to run the Disk Defragmenter to defragment them by placing the same files in consecutive sectors.SSD uses a different writing process and doesn’t use any sectors, so you can’t defragment it. You can trim an SSD. However, doing so uses a limited amount of the maximum possible write cycle on the drive. So, we don’t recommend doing so.Regardless, if you have HDDs, here’s how you can defragment them:It’s actually better to set automatic defragmentation at certain intervals. To do so,
Update Drivers from Official Websites
Another thing you should do to optimize Windows is to update your device drivers. While you can do so using the Device Manager, it is better to download the drivers directly from official websites and install them. Platforms like Intel, AMD, and NVIDIA, along with the official websites of your device manufacturers, usually automatically detect your device and install the drivers. If they don’t, you can go to the Device Manager and check the device properties.You can also update the drivers using the dedicated software of your device or graphics software.
Update Windows
You should also keep your system fully updated to have an optimal environment. The newer updates include additional features along with necessary bug fixes. Here’s how you can update Windows OS:
Disable Delivery Optimization
Delivery Optimization is a feature on Windows that allows the device to download system and driver updates from other computers on the same network or upload them to those computers. This way, you can limit the amount of time your system spends downloading updates from Microsoft.While this feature may sound nice, it is not really necessary. You don’t save that much time with this feature. Instead, it uses up your storage space. This feature also consumes a lot of system resources, so you may experience lags when it is downloading or uploading the updates.So, follow the steps below to disable it:
Disable Metered Connection
A Metered Connection is a type of internet connection that allows a limited amount of data per month. For instance, a data plan that offers 100 Mbps for 100 GB of data per month and 1 Mbps when the data is used up would be a metered connection.Windows restricts the data usage of a metered connection providing slower internet but higher longevity of the data limit. Your system automatically considers cell networks as metered. However, it is also possible to set other networks as metered connections.If you ever do so, your network speed suffers a lot. So, we recommend only setting any limited network connection as metered and disabling this option otherwise. Here’s how you can disable it:
Disable Cortana
Cortana is Microsoft’s default voice assistant for Windows systems. It integrates the search feature and includes additional features such as reminders, notifications, etc. However, most users don’t really use this feature and, in fact, find it to be more intrusive. If you also feel the same, you can disable it permanently using the steps below:If you are a Windows Home user, the Group Policy Editor might not be enabled on your system. Here, you can use the Registry Editor to perform this task instead.Then, restart your PC.
Enable/Disable Hibernation
Hibernation or hybrid sleep is a feature in Windows to improve the startup time. When enabled, your system creates a Hiberfil.sys file whose size depends on your RAM. It usually ranges between 20% to the full size of your RAM.Your system stores all contents of the RAM in the file while hibernating so that you can boot into the same state at the next reboot.However, if you don’t hibernate your PC, this feature only improves the boot time by a second or two (only if fast startup is enabled) while taking up gigabytes of storage space.So, you can disable it if you don’t need the feature or want to make more of your storage available for use. Here’s what you need to do:
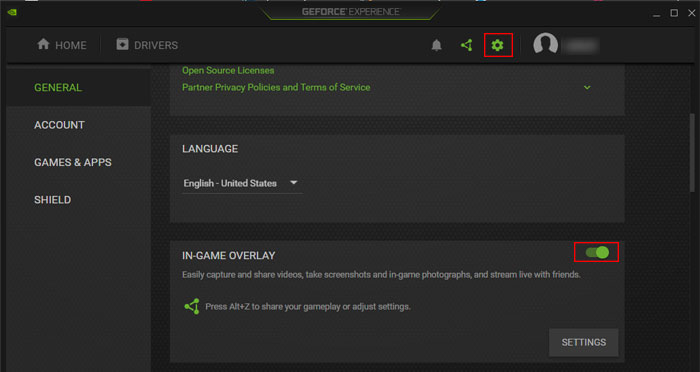
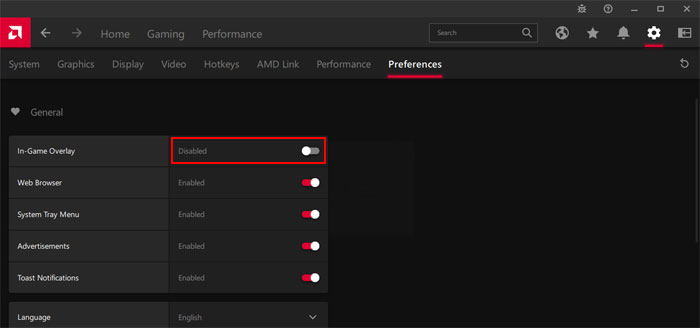
Disable Gaming Overlays
Gaming Overlays are very necessary tools for streamers. However, other users don’t have much need for them. So, if you don’t steam your gameplay, it’s better to disable all gaming overlays. To do so,For NVIDIAFor AMDIf you use any third-party overlays, you can check their official sources if you don’t know how to disable them.
Disable Unused Audio Devices
Your system usually enables the audio device controllers for all devices currently connected to your computer. However, people generally use only one of those devices. For instance, your computer may have controllers for external speakers, but you may only use headsets instead. In such cases, the system is providing at least some resources to the controller.So, you can disable these devices until you start using them to make your system more optimal. Follow the steps below to do so:
Run SFC and DISM
Windows includes two utilities, System File Checker (SFC) and Deployment Image Servicing and Management (DISM), to check and repair corrupt system files. DISM checks and restores the system image from the online Windows servers, and SFC repairs your system files using the files in the components store.It’s usually better to run DISM before SFC as DISM can also repair any missing component store files.Here’s how you can run these tools:
Enable USB ReadyBoost
If you want to improve the performance of your USB drives on a low-end system, you can use USB ReadyBoost. It allocates some storage space as memory to speed up the device.Most newer computers are fast enough that the feature is not available or necessary. However, for an older system, it’s better to use it as it won’t be available if you don’t need it. To do so,
Modify Network Throttling Index
Windows sometimes throttles your network and internet connection to maintain more stability. It results in reduced speed and can be an impediment, especially while playing online games where ping matters a lot.You can disable this setting by modifying the NetworkThrottlingIndex registry entry using the steps below:
Give Priority to Gaming Processes
Windows uses the Multimedia Class Scheduler service (MMCSS) to specify the priority settings for multimedia applications like games. It is possible to modify some registry settings to have this service give more priority to gaming. Here’s how you can do so:
Enable Explicit Congestion Notification
By default, the TCP/IP network notifies network congestion by dropping network packets. However, it also contains an Explicit Congestion Notification (ECN) feature to notify the congestion without dropping any packets.ECN is enabled in the latest Windows servers but disabled in the non-server systems. You can enable this feature if you regularly experience traffic congestion and network packet loss (usually signified by slow and incomplete web pages). To do so,
Disable Receive Side Scaling
Receive Side Scaling (RSS) is a network feature that efficiently distributes network processes across all the CPUs in your system. This feature improves the network system’s performance if you have a normal or high-end system.However, enabling RSS is not recommended with a low-end system where the apps and games you run use up a lot of CPU resources.This feature is On by default, so you need to disable it for low-end systems using the steps below:
Use Third-party Optimization Apps
In addition to all the methods we mentioned previously, you can also use third-party tools like CPU Core Parking, QuickCPU, Timer Resolution, and registry Cleaners like CCleaner to optimize your PC. These applications provide different but fantastic features to clean your computer of unnecessary things and use its full potential.However, we recommend visiting the official website to learn the proper method to use the apps before installing and using the programs. You can also check user opinions to confirm their reliability.